Installing Liferay DXP 2026.Q1 on Red Hat JBoss Web Server 6.2.3: Filling the Gaps in the Tomcat Guide
This is LR Tools’ rewrite of a detailed installation walkthrough by David H Nebinger on Liferay.dev. The reference OS throughout is RHEL 10; since JBoss Web Server (JWS) 6.2.3 developer downloads weren’t available at write-up time, the original testing substituted Apache Tomcat 10.1.57 with its directory renamed to simulate a JWS layout — worth knowing if you’re trying to reproduce the steps exactly.

Why the Tomcat guide isn’t quite enough
Liferay’s official Tomcat installation guide is a solid starting point, but it makes assumptions that don’t hold cleanly once you’re deploying DXP 2026.Q1 onto JWS 6.2.3 specifically. Three gaps matter most: an outdated Java version example, missing JVM module-access flags that Liferay actually needs, and an assumption about where Liferay Home lives that doesn’t transfer to a JWS install. Everything below exists to close those three gaps — the rest of the process will feel familiar if you’ve installed Liferay on Tomcat before.
Why choose JWS over plain Tomcat at all
JWS is a distinct Red Hat middleware product, not just “Tomcat with a different name.” Under the hood, JWS 6.x bundles Apache Tomcat 10.1 alongside Apache HTTP Server integration, production-grade connectors like mod_cluster, native Tomcat libraries, APR, OpenSSL integration, and Red Hat’s own middleware support lifecycle. Organizations reach for it over a plain Tomcat install when they need a fully supported Tomcat 10.1 runtime, longer enterprise compliance windows, an actual Red Hat support channel, supported Apache HTTP Server connector integration, FIPS or other hardened-runtime requirements, or a deployment model that fits standard RHEL subscriptions, archives, and container images. RHEL 10 does ship a native Tomcat 10.1 package on its own, so JWS specifically matters when organizational policy calls for Red Hat Middleware Runtimes by name.
Getting the Java version right
DXP 2026.Q1 supports Tomcat 10.1 and RHEL 10, which lines up with what JWS 6.x already bundles — so far so good. The part that trips people up is Java: Liferay’s own Tomcat documentation still shows a Java 8 setenv.sh example, and that example is not valid for 2026.Q1. DXP 2026.Q1 and later require JDK 21, with no exceptions — not Java 8, and not letting the server default to something newer like JDK 25 either.
Install JDK 21 with whichever package manager matches your distribution:
RHEL 10:
$ sudo dnf install java-21-openjdk-headless unzip tar
$ sudo alternatives --config java
$ java -version
Debian/Ubuntu:
$ sudo apt install openjdk-21-jdk-headless unzip tarSUSE:
$ sudo zypper install java-21-openjdk-headless unzip tarFedora:
$ sudo dnf install java-21-openjdk-headless unzip tarGetting the artifacts
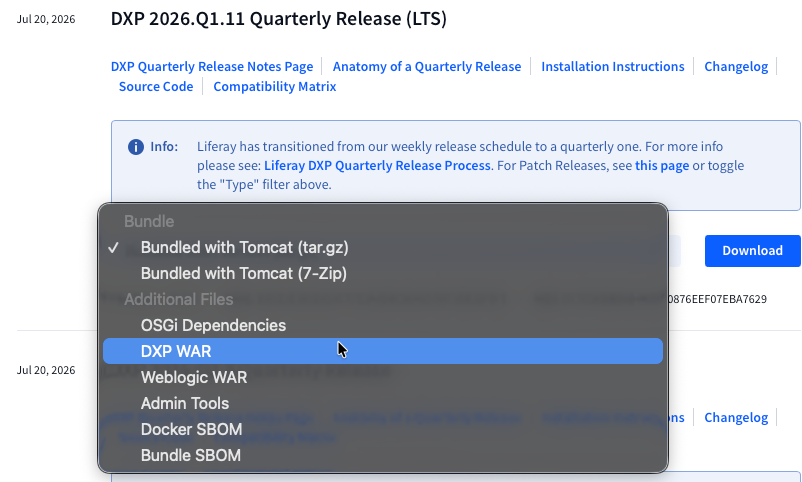
You’ll need four things: the Liferay DXP WAR, the OSGi Dependencies package, the Admin Tools package, and — purely as a reference, not something you’ll actually run — the Tomcat-bundled Liferay package. That last one matters because its directory layout, scripts, ROOT.xml, and baked-in assumptions are exactly what Liferay expects a runtime to look like, so diffing your JWS setup against it is a useful troubleshooting tool later.
JWS itself comes from the Red Hat Customer Portal: create or use a Red Hat Developer account, confirm you have access through the no-cost Individual Developer Subscription or a Middleware Runtimes subscription, then find Red Hat JBoss Web Server in the Customer Portal downloads and grab the 6.2.3 application server archive. On a Mac, the generic JWS ZIP is normally sufficient for local testing since Tomcat itself is Java-based; other platforms may need the native components if you plan to exercise Apache HTTP Server integration, APR, OpenSSL, or the production connectors.
Choosing an explicit directory layout
The official Tomcat guide assumes Liferay Home is simply the parent folder of the Tomcat directory — a reasonable default for Liferay’s own bundle, but not something to rely on with a JWS install. Use explicit, separate paths instead:
/opt/jws-6.2.3              JBoss Web Server installation
/opt/jws-6.2.3/tomcat       Tomcat runtime
/opt/liferay                Liferay Home
Set up the Liferay Home structure:
$ sudo mkdir -p /opt/liferay/{data,deploy,license}
$ sudo mkdir -p /opt/liferay/{logs,osgi,tools}
$ sudo chown -R tomcat:tomcat /opt/liferay
And the tomcat service user, if it doesn’t already exist (Red Hat’s JWS post-install scripts can also create this automatically during an archive install):
$ sudo groupadd -g 53 -r tomcat
$ sudo useradd -c "tomcat" -u 53 -g tomcat \
  -s /sbin/nologin -r tomcat
Installing JBoss Web Server
$ sudo unzip jws-6.2.3-application-server.zip -d /opt
$ sudo chown -R tomcat:tomcat /opt/jws-6.2.3
Set the working environment variables you’ll reference throughout the rest of setup:
$ export JWS_HOME=/opt/jws-6.2.3
$ export CATALINA_HOME=$JWS_HOME/tomcat
$ export CATALINA_BASE=$CATALINA_HOME
$ export LIFERAY_HOME=/opt/liferay
For systemd-managed startup on RHEL:
$ cd /opt/jws-6.2.3/tomcat
$ sudo sh .postinstall.systemd
$ sudo systemctl enable jws6-tomcat.service
If you install JWS via a package manager instead of the archive, CATALINA_HOME and CATALINA_BASE may end up in different locations by default — that’s fine, just make sure the LIFERAY_HOME setup below still happens regardless of how JWS itself was installed.
Before deploying Liferay, remove the default $CATALINA_BASE/webapps/ROOT (Liferay replaces it) along with any other default webapps you don’t need.
Installing the Liferay files
OSGi dependencies:
$ sudo unzip liferay-dxp-osgi-*.zip -d /opt/liferay/osgi
$ sudo chown -R tomcat:tomcat /opt/liferay/osgi
Admin tools:
$ sudo unzip liferay-dxp-tools-*.zip \
  -d /opt/liferay
$ sudo chown -R tomcat:tomcat /opt/liferay/tools
Deployable artifacts — license files, OSGi modules, WARs, themes — go into /opt/liferay/deploy.
Deploy the DXP WAR as the ROOT application:
$ sudo rm -rf $CATALINA_BASE/webapps/ROOT
$ sudo mkdir -p $CATALINA_BASE/webapps/ROOT
$ sudo unzip liferay-dxp-*.war -d $CATALINA_BASE/webapps/ROOT
$ sudo chown -R tomcat:tomcat $CATALINA_BASE/webapps/ROOT
Pointing Liferay at its home directory explicitly
Don’t rely on Liferay inferring its home directory — set it directly in /opt/liferay/portal-ext.properties:
liferay.home=/opt/liferayand again as a JVM system property in setenv.sh (below):
-Dliferay.home=/opt/liferayA production portal-ext.properties usually carries database, mail, and clustering settings alongside this, e.g.:
liferay.home=/opt/liferay

jdbc.default.driverClassName=org.postgresql.Driver
jdbc.default.url=jdbc:postgresql://db.example.com:5432/lportal
jdbc.default.username=liferay
jdbc.default.password=change-me
The bundled Hypersonic database should never be used outside local testing.
The setenv.sh that actually works for 2026.Q1
This is the file where the Java-8-example problem in the official docs shows up most directly. Create or update /opt/jws-6.2.3/tomcat/bin/setenv.sh:
# Ensure use of JDK21 for Liferay/Tomcat
export JAVA_HOME=/usr/lib/jvm/java-21-openjdk
export PATH="$JAVA_HOME/bin:$PATH"

# Set this to your real liferay home. Exporting as
# an environment var ensures visibility within the
# running process.
export LIFERAY_HOME=/opt/liferay

CATALINA_OPTS="$CATALINA_OPTS -Dfile.encoding=UTF-8"
CATALINA_OPTS="$CATALINA_OPTS -Djava.net.preferIPv4Stack=true"
CATALINA_OPTS="$CATALINA_OPTS -Duser.timezone=GMT"
CATALINA_OPTS="$CATALINA_OPTS -Dliferay.home=$LIFERAY_HOME"

CATALINA_OPTS="$CATALINA_OPTS -Xms2560m -Xmx2560m"
CATALINA_OPTS="$CATALINA_OPTS -XX:NewSize=1536m"
CATALINA_OPTS="$CATALINA_OPTS -XX:MaxNewSize=1536m"
CATALINA_OPTS="$CATALINA_OPTS -XX:MetaspaceSize=768m"
CATALINA_OPTS="$CATALINA_OPTS -XX:MaxMetaspaceSize=768m"
CATALINA_OPTS="$CATALINA_OPTS -XX:SurvivorRatio=7"

export JDK_JAVA_OPTIONS="${JDK_JAVA_OPTIONS} \
 --add-opens=java.base/java.lang=ALL-UNNAMED \
 --add-opens=java.base/java.lang.invoke=ALL-UNNAMED \
 --add-opens=java.base/java.lang.reflect=ALL-UNNAMED \
 --add-opens=java.base/java.net=ALL-UNNAMED \
 --add-opens=java.base/java.util=ALL-UNNAMED \
 --add-opens=java.base/sun.net.www.protocol.http=ALL-UNNAMED \
 --add-opens=java.base/sun.net.www.protocol.https=ALL-UNNAMED \
 --add-opens=java.base/sun.util.calendar=ALL-UNNAMED \
 --add-opens=java.rmi/sun.rmi.transport=ALL-UNNAMED \
 --add-opens=jdk.zipfs/jdk.nio.zipfs=ALL-UNNAMED"
$ sudo chmod 750 /opt/jws-6.2.3/tomcat/bin/setenv.sh
$ sudo chown tomcat:tomcat /opt/jws-6.2.3/tomcat/bin/setenv.shThe --add-opens flags aren’t cosmetic — without them, Liferay can throw reflective-access warnings or fail to start outright against Java’s module boundaries. Treat the memory settings as a vanilla starting point only; production sizing needs Liferay’s own performance guidance plus real load testing. And even under systemd, this JVM/environment configuration still belongs in setenv.sh, not in systemd unit overrides, per Red Hat’s own JBoss Web Server 6.2 installation documentation.
Porting over the Liferay-specific Tomcat configuration
Diff the Liferay Tomcat bundle’s configuration against your JWS Tomcat configuration, and carry over the Liferay-specific pieces — especially:
conf/Catalina/localhost/ROOT.xmlconf/catalina.propertiesconf/server.xmlconf/web.xmlconf/logging.properties- scripts under
bin/
The one that matters most: in conf/catalina.properties, Liferay’s support-tomcat.jar has to be visible to Tomcat’s common class loader, so prepend it to common.loader:
common.loader="${catalina.home}/webapps/ROOT/WEB-INF/
  lib/support-tomcat.jar",...
Also confirm the HTTP connector in server.xml specifies UTF-8:
<Connector
    port="8080"
    protocol="HTTP/1.1"
    connectionTimeout="20000"
    redirectPort="8443"
    URIEncoding="UTF-8" />
If JWS sits behind Apache HTTP Server, a load balancer, or OpenShift routing, review proxy header handling, secure-scheme detection, and connector strategy before sending it production traffic.
Starting and validating the install
$ sudo systemctl start jws6-tomcat.service
$ sudo systemctl status jws6-tomcat.service
Watch the startup log:
$ sudo tail -f /opt/jws-6.2.3/tomcat/logs/catalina.outWorth confirming during that startup: Java reports version 21, Liferay Home resolves to /opt/liferay, OSGi modules load from /opt/liferay/osgi, the database connection is not Hypersonic, there are no failures related to missing Java module access, support-tomcat.jar is visible via common.loader, and the portal deploys correctly as ROOT.
Once you can log in, double-check the resolved Liferay Home under Global Menu → Control Panel → Server Administration → Properties → System Properties, searching for liferay.home and confirming it shows /opt/liferay.
What’s still left after the app server is running
Getting the app server up is only part of a real deployment. Beyond it you still need to decide on database backup and restore, Document Library storage, search engine configuration, TLS termination strategy, reverse proxy header handling, session strategy (sticky sessions are recommended), clustering, your Marketplace/hot-deploy policy, the patch and quarterly-update workflow, and — on SELinux-enabled RHEL specifically — SELinux context and filesystem permissions for every directory JWS touches, /opt/liferay and its logs included, not just standard Unix ownership.
The tradeoff, honestly
JWS buys you a supported enterprise Tomcat runtime at the cost of owning more of the assembly yourself. Liferay’s own Tomcat bundle is simpler precisely because Liferay has already made the runtime decisions for you. JWS earns its place when platform standards specifically require Red Hat middleware support or packaging, or a supported Tomcat distribution that matches existing operational controls — the cost is explicitly managing the Java version, Liferay Home, JVM options, the Tomcat common class loader configuration, and service/ownership management yourself. None of that is a downside on its own — it just needs to be a deliberate choice, not an afterthought.
Upgrading later
Upgrades on JWS take more manual care than on Liferay’s own Tomcat bundle or Docker image, though the process is still straightforward:
- Download the new DXP WAR, OSGi dependencies ZIP, and tools ZIP.
- Replace ROOT the same way as the initial install:
$ sudo rm -rf $CATALINA_BASE/webapps/ROOT
$ sudo mkdir -p $CATALINA_BASE/webapps/ROOT
$ sudo unzip liferay-dxp-*.war -d $CATALINA_BASE/webapps/ROOT
$ sudo chown -R tomcat:tomcat $CATALINA_BASE/webapps/ROOT- For OSGi dependencies, be selective — delete only the
marketplace,portal,portal-war,state, andstaticdirectories under/opt/liferay/osgi(other folders may hold your own custom artifacts, so leave those alone), then extract the new package:
$ sudo unzip liferay-dxp-osgi-*.zip -d /opt/liferay/osgi
$ sudo chown -R tomcat:tomcat /opt/liferay/osgi- For the tools directory, back up any property files first — the tools ZIP overwrites them — then extract and restore your settings:
$ sudo unzip liferay-dxp-tools-*.zip \
  -d /opt/liferay
$ sudo chown -R tomcat:tomcat /opt/liferay/tools- Check the new Liferay Tomcat bundle for any changes to
setenv.shorcatalina.propertiesand port those forward into your JWS configuration too.
The short version
Three corrections separate a working DXP 2026.Q1 install on JWS 6.2.3 from a failed one modeled too literally on the Tomcat guide: use JDK 21, not the older Java examples still sitting in the official docs; add the required --add-opens JVM module flags; and set Liferay Home explicitly instead of trusting directory-parent inference. Get those three right and the rest of the deployment model is exactly what you’d expect — JWS supplies Tomcat 10.1, Liferay supplies the WAR and OSGi dependencies, and /opt/liferay becomes the stable home for configuration, modules, logs, data, and tooling going forward.
This article is LR Tools’ rewrite of the original post by David H Nebinger — read it on Liferay.dev for the author’s own framing. For further reference: Liferay DXP 2026.Q1 compatibility matrix, Liferay JVM configuration, Liferay Home reference, and the Red Hat JBoss Web Server 6.2 Installation Guide.
This article is adapted from: David H Nebinger, Liferay.dev